I’ve been trying to figure out how to actually use cuticle removers and the advice out there is all over the place.
The blue Sally Hansen one keeps coming up in recs and I feel like it might be the missing step in my mani routine. Quick terminology thing though, because I keep seeing people mix this up: the “invisible cuticle” is the pterygium, aka dead tissue stuck to the nail plate. The actual cuticle/eponychium is living skin at the base of the nail, not something I want to dissolve.
Do you brush the remover only onto the nail plate where the dead tissue actually sits, or do you also swipe it around the eponychium itself? Tutorials seem to do both and nobody explains why.
Some people even paint liquid latex around the nail first as a barrier (smart, but also a whole extra step). And is the 15-second timing thing really enough to protect live skin, or should I be treating this stuff with more caution than that?
That dead, nearly invisible film stuck to the nail plate is cuticle. Pterygium is an abnormal adhesion or scarring of the nail fold. The living skin at the base is the proximal nail fold, or eponychium, and you’re right that it really shouldn’t be cut or scraped.
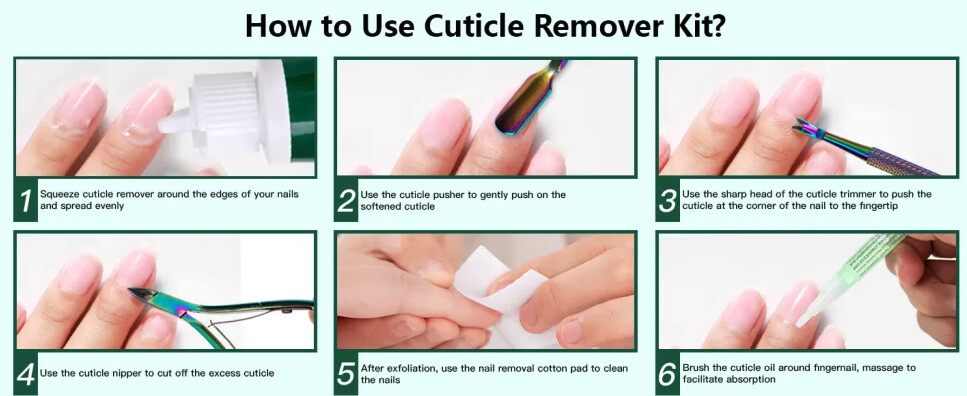
With the blue Sally Hansen remover, I run a very thin line across the plate right where it meets the proximal fold and along the sidewalls. It’ll touch the surrounding skin a little, which is expected. I don’t paint it all over the skin or flood the area. Liquid latex seems like overkill unless you’re especially sensitive, since it might block the remover from reaching the cuticle right at the edges, which is the part you want gone.
Fifteen seconds is plenty for me because this stuff is pretty alkaline and works fast. I do a few nails at a time, push with a wooden stick or pusher without much pressure, then rinse well with warm soapy water. I wouldn’t treat 15 seconds as a guarantee that live skin can’t get irritated though. Skip broken skin and stop if it stings or burns. Don’t go past the label time. Cuticle oil or hand cream after. I also use a lot less product than most tutorials show.
I think what you do in the thirty seconds after using the remover is where people wreck their nails.
I put it on dry nails, no soak, then nudge the softened film off with a wooden stick wrapped in a bit of damp cotton. If something needs pressure or I catch myself scraping the same spot twice, I stop and leave it. Metal tools take nail plate off faster than you’d think. Keep it off hangnails, cuts, cracked sidewalls, or skin you just clipped. Even brief contact there stings and the irritation hangs around. If the skin is already inflamed, I wait. If you have sensitive skin or you’ve never used an alkaline remover before, try it on one nail first and see how the fold reacts.
Two different jobs. That’s why a lot of tutorials do both.
Brushing it on the nail plate is the actual cuticle-remover work. It dissolves that dead film so your polish has something to grip and doesn’t start lifting at the base a day later. Swiping it around the eponychium is a softening move, so the fold pushes back easily and looks tidy on camera. Nothing wrong with it, but the goal there is pushing. In a thirty-second clip the two look identical.
Dead tissue on the plate takes a few weeks to build up, so if you’re using it every time you paint your nails you’re mostly putting potassium hydroxide on skin that has nothing left to give. Every two or three weeks here (but other opinions differ). In between, I push back after a shower and leave it. Dry-skin months, maybe a bit more often, but doing it as needed is better than doing it because you have a routine for it.
The pusher does the damage, not the remover, unless you’re doing something really weird with it.
On healthy skin, a little contact is fine. It softens and dries out the top layer, which is why the live skin feels weird and tacky if you leave it on. Then people see softened skin and start pushing at it like it’s dead tissue. It’s live skin. The product softened it and the pusher did the damage.
Which brings me to how hard to push. Barely. If the remover did its job, an orangewood stick with a light sweep lifts the film off the plate and you’ll see it ball up. If you’re scraping, either you didn’t wait long enough or there’s nothing left and you’re scraping living skin. Stop there. Don’t push harder. Also, soaking first dilutes it, so I do it on dry nails now.
Yes! In dry-skin months, I go the other way. Potassium hydroxide makes the already-dry skin around the base of the nail more brittle, so I go longer between uses, even if it looks less tidy than I’d like.
Your point about lifting film off the plate vs just softening the cuticle explains a lot. That extra pass is mostly cosmetic.
I’ll take a little leftover residue over a squeaky-clean nail plate any day.
Every extra pass means more potassium hydroxide sitting on the live skin around the nail, and my hands are already dry enough as it is. These days I stop once most of it’s off and leave it at that.
Cuticle oil before you take anything off. I push the cuticles back first and rinse everything, then I oil them and go back to deal with whatever dead tissue is still hanging around. The nipper stays in the drawer unless there’s an actual hangnail sticking up and catching on my sweaters, which is the only time I think it’s really warranted anyway.
Push first, always. Then the remover goes on to dissolve whatever’s still clinging to the plate (there’s usually a bit left, no matter how careful I am).
Baby toothbrush on the cuticle area after you’ve rinsed the remover off. It gets all the loosened bits the pusher skipped over, and you’re not going back in with more product on live skin, which is the part that always got me.
I keep one just for this now (never touches teeth).
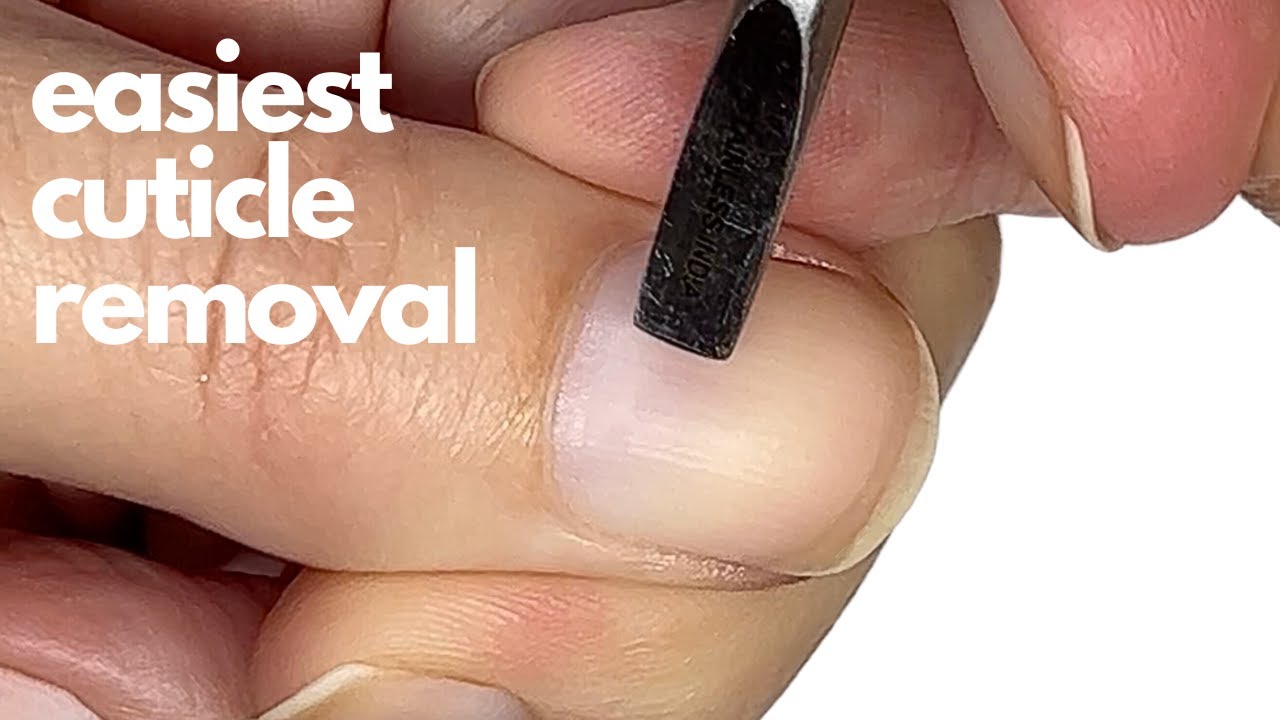
There’s a manicure video that’s mostly cuticle work from start to finish. Here it is if you want to see the technique. Instructions never clicked for me the same way, something about seeing the angle of the pusher I think.
Nail brush. Every single time after cuticle remover, no exceptions.
Potassium hydroxide can sit under the proximal fold and eat into the nail plate. You end up with these weird curved dents that take forever to grow out. It doesn’t hurt, but those spots stay weaker until they’re gone, which is the annoying part.
I barely get much buildup anyway (never have), so now I just scrub well and let them dry completely before doing anything else.
The skin-eating thing is way overblown, at least with the Sally Hansen one. I leave it on 3-5 minutes and my nail folds come out looking moisturized and nice. No pain or anything. Sometimes I’ll even do a second pass, then just wash it off. Showering beforehand makes it work even better if you want to go that route.
For virgin nails, I cover the whole nail plate, not just the cuticle area. Dead tissue can be hiding anywhere on there and you won’t see it. After that first time though, just stick to the base near the nail fold.
Glass cuticle pushers. I use one with the Sally Hansen remover. Thin layer, let it sit a minute, wipe clean, then push back. No cutting, which is better for your nails anyway.
Weekly routine plus oil every day and things stay looking clean without any sharp tools near my fingers. The oil part matters more than people think. I’ve skipped it for a week before and you can tell.
The wet washcloth step is where everything comes together. After the 15 seconds and the pushing, I just take a damp washcloth and rub everything off, then snip whatever little bits of dead skin are still hanging around with cuticle scissors. Never had irritation or anything, really, and this has been my routine for years at this point.
It’s a solution to a problem you don’t have. Peeling that stuff off takes longer than the whole cuticle step, and if you have any latex sensitivity you’ve now given yourself a rash exactly where you were trying to prevent a chemical burn. Save it for glitter cleanup.
The rinse is the part I want to add. That remover is alkaline. Leave residue on the nail and your polish or gel is going down onto a pH that’s wrong for adhesion, which is pretty ironic when adhesion is why you used it in the first place. So use soap and water to scrub, then alcohol or a dehydrator before base coat.
The 15 seconds on the bottle is the minimum before the stuff has done anything useful at all.