Hoping for some rhinestone advice.
I have never used rhinestones on nails before. What is the best way to actually make them stay? Do I need proper nail gem glue, or can I get away with gel top coat, press them in, and cure like normal? Would regular top coat hold them at all, or would they just pop right off? Any tips on placement or sealing them in would be really appreciated.
22 Likes
Skip regular top coat. It’ll hold a tiny gem for maybe a day before it ends up in your hair or stuck to your sweater. Gel top coat works for little stones, from grain-of-sand size up to a couple millimeters.
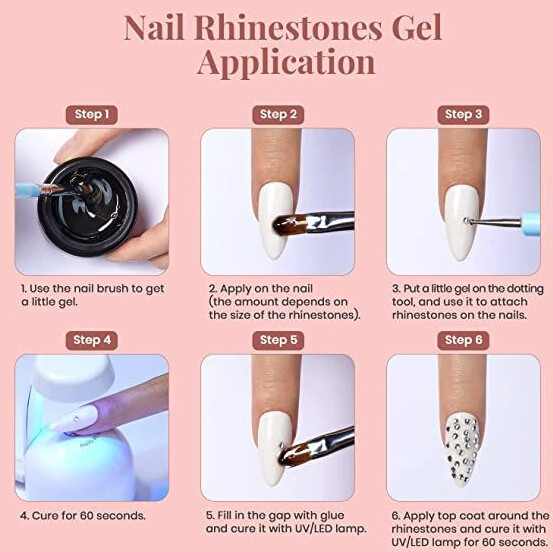
Do your color and cure it, then drop a thick blob of top coat where the gem goes. Set the stone with a wax pencil or a dotting tool with a bit of sticky tack on the end, and press it until the gel squishes up around the base. Cure. Then go back around the edge of each stone with a thin line of top coat, like you’re building a little wall around it.
Don’t paint over the top of the gem or it’ll go cloudy and look like a sad piece of plastic.
Cure again and you’re done. Anything bigger or those chunky, pointy-backed ones needs rhinestone gel or gem glue. It’s thick, gloopy stuff that stays put and cures rock hard. Builder gel works in a pinch if you already have some sitting around. Nail glue is for emergencies only, like when one pops off on day four and you’re at work. It dries brittle and really doesn’t love water.
Keep them off the very tip because they will snag on everything you own. Leave a small gap at the cuticle too; otherwise, it looks strange after a week of growth. If you’re indecisive like me, lay the whole design out on a piece of tape first. Shuffling stones around in wet gel gets messy fast. Glass crystals look miles better than acrylic.
They’re slippery little devils, so grab them from the side.
1 Like
Adding to the gel top coat suggestion.
Once you get past a couple millimeters, or you’re working with anything chunky and flat-backed like a wheel crystal, regular top coat doesn’t have the body to hold it. It levels and slides away from the base, and then the stone is sitting on a thin skin of gel that cracks the first time you catch it on a doorknob. For those, I use a dedicated rhinestone gel, the really thick kind that basically doesn’t move once it’s down. Blob some on and set the stone in it, then cure.
A tiny tube lasts forever, and if you plan on doing this more than once, you should just buy one.
Nail glue, since someone will suggest it: I’d skip it for anything you want to wear for two weeks. It holds fine at first but dries brittle, and it can frost around the edges so your stone ends up with a cloudy halo.
Placement does most of the work for longevity. Anything sitting right at the free edge catches on everything you touch, so I keep bigger pieces down toward the cuticle and the middle of the nail where they’re protected, and let the small ones drift toward the tip if I want the design to travel. Also try not to put a big stone where the nail flexes most, usually a little past the halfway mark. Same reason you build your apex there. The nail bends and the stone doesn’t, so the gel underneath gives out quicker than you’d like.
On sealing, don’t flood gel over the top of the stone thinking more is better. Gel across the face of a crystal dulls it and you lose the point of having it there. Hug the base with gel and cure, then wipe the stones with a bit of alcohol so they actually sparkle. I skipped that last step for months and wondered why mine always looked dusty.
2 Likes
Flat-backed stones make a big big difference, especially on a first try. I’d also keep them away from the free edge and the cuticle area since those spots take the most knocks and snag on hair.
Lay the design out before you get started, then move each stone over with a wax pickup pencil. Clusters wear better when the stones sit tight together without awkward gaps. Nail gem glue works fine over a finished manicure, but use as little as you can and keep it off your skin.
Prep matters. Once the color’s done I wipe off any dust or oil. If I’m working over a really slick no-wipe top coat I’ll also lightly buff the tiny spot where the design will sit so the adhesive has something to grab. You don’t need to rough up the whole nail.
Also, gel won’t cure through a stone. Opaque stones and metal-backed crystals block the lamp, so you end up with a thick puddle underneath that’s only partly cured. Use a small amount, flash cure it so it stops moving, then do a full cure from the top and sides. For bigger opaque charms, I just use a nail adhesive made for gems. Uncured gel under something will give you trouble later.
1 Like
Agreed on the tight-cluster thing. I put the biggest stone down first and tuck the smaller ones in around it, and that alone gets rid of most of the awkward gaps. Also, take a quick phone photo of the layout before you start moving stones over. Sounds fussy, but otherwise I forget the design halfway through and end up improvising badly.
Staying back from the cuticle is worth it too. Even a tiny glue ridge there catches every strand of hair.
The tape layout trick saved me a lot of grief, though I use a strip of clear packing tape so I can see the spacing.
This is the difference between sparkle and sad gray pebbles.
I lost every stone on my thumbs inside a week and spent the whole time blaming the gel. Thumbs and index fingers flex way more than the rest in normal use and a stone that stays put for the full two weeks on your ring finger can pop off the same spot on a thumb in two days. The flex point also moves depending on what’s underneath.
On a natural nail with just gel polish, the bend sits about where you describe, and the stone needs to stay well clear of it. On a structured set with a builder layer and a proper apex, that same zone is the stiffest part of the nail. I’ve put larger crystals right on top of the apex with no trouble because the nail moves as a single piece and the gel under the stone isn’t stretching anymore.
2 Likes
Ha, that’s the nightmare scenario I was picturing.
So if I’m reading you right, the top coat clouds the stones when you glob it straight over them, which is what I would have done without thinking twice. Just seal around the base.
I already have the rhinestones sitting here waiting, so good timing!
The acrylic or polygel base route works best for this. You’re embedding the stone into something with actual structure, so it becomes part of the nail rather than sitting on top waiting to catch on a sweater sleeve.
Removal is a whole process, though. That’s the tradeoff. If you want stones that stay put through daily life, that’s the method with the best track record in my experience. The other options are fine for shorter wear, like a weekend or an event.
Kokoist accessory bond works well. I follow it with a thick top coat like Kokoist ultra glossy non wipe.
Izemi 99 high viscosity top is another one I like, though the inhibition layer can be annoying to wipe clean around charms. Builder gel works too, it’s stronger than top coat so you can pack it right around the charm for extra hold.
I gave up on using gel to stick down rhinestones. Too many fell off within days, and the curing is the bigger problem anyway. Gel that looks hard isn’t always fully cured, and when you’ve got a stone sitting on top blocking the lamp, whatever’s underneath stays semi-cured no matter how long you flash it.
Then you soak off weeks later and those uncured chemicals are sitting right against your skin. Some people develop allergies from that, and you won’t know you’re sensitive until it happens.
For short wear (a weekend or an event), regular top coat is fine. Anything longer, dedicated gem glue is worth it.
1 Like
Nail glue works fine for gems. It’s what I use when I don’t feel like messing with gel layers and cure times.
Just make sure it’s the actual adhesive meant for rhinestones, not the brush-on stuff for tips. Different consistency, and it holds way better.
Liner brush and hard gel. Poke it around the edges of each stone after you cure and that’s it, done.
Sealing up those tiny crevices means the stones stop catching on your hair and ripping off a week later.
Top coat over everything. That’s the fix.
I glue the rhinestones down and then seal the whole thing. The snagging stops completely, so no more hair catching every time I wash it. The glue holds them in place, but the top coat is what makes them livable.
It takes a few thin layers around the edges of the stones if you want it smooth.
Regular polish or gel makes a huge difference. Lacquer has to be truly dry before you glue anything down, otherwise the base color dents and wrinkles under the stone.
What size stones are we talking, tiny accent crystals or the chunky statement ones?
On myself, tiny scattered crystals over lacquer, I just use plain nail resin. But a raised cluster over gel is different. I want something thicker there so the stones stay put instead of skating around like little glass hockey pucks.
Regular nail glue. That’s all I use.
The part that actually matters is floating gel top coat over everything after, so the stones get locked in from all sides (I do a fairly thick layer). Cure like usual. They stay put way better than I expected.
The side-to-side thing is what fixed it for me. Light doesn’t reach under the gem if you’re just sitting there with your hand flat, so I rotate the nail back and forth under the lamp, tilting it a bit so the gel gets hit from different angles. Most of my lifting stopped after that.
Takes a little longer per finger, but not by much.
Seal around the stone, not just over the top of it. That’s the part people skip. Dollar Tree gel glue works fine, by the way. Costs basically nothing, which matters when you’re going through it that fast.